
Harbor Freight Dust Collector 2 Stage Cyclone Modification

I've been using a cyclone on my shop vac for a few years now and I've always been happy with it. Even though I've liked it, there's always those times where you start planing a bunch of boards and it gets filled up way too fast. Plus the air flow just wasn't there to collect from some of my larger tools efficiently. After doing some research and counting my pennies, I decided to go for the Harbor Freight dust collector and planned on modifying it into a two stage cyclone down the road. Only a couple of months after purchasing the DC, I started purchasing bits and pieces of what I wanted in my final setup.
After slowly collecting part after part for my two stage cyclone collector, I had all of the following pieces:
- Central Machinery 2HP Dust Collector (Cheap at Harbor Freight with a 20% off coupon)
- Super Dust Deputy by ONEIDA AIR SYSTEMS
- 30 Gal Round Fiber Drums
- Wynn 35A 274 NANO Cartridge Kit
- 6 to 5 Inch and 5 to 4 Inch reducer
- 2 x 5 Inch Duct Flanges (For the small hose section between the bottom of the cyclone and the 30 gal drum.)
- The 5-inch flange has been hard to get recently from Amazon so if you find that is the case and can't find a reasonably priced one elsewhere, you might go with a 4-inch or 6-inch setup.
- I also have found this alternate 5-inch duct collar directly from Oneida-Air Systems
- *UPDATE* BonPacific commented below and said he was having success splitting this 5" Blastgate in half for the two 5" flanges.
- I also had a few scrap pieces of plywood and I picked up 10 2x4s from the local home center.
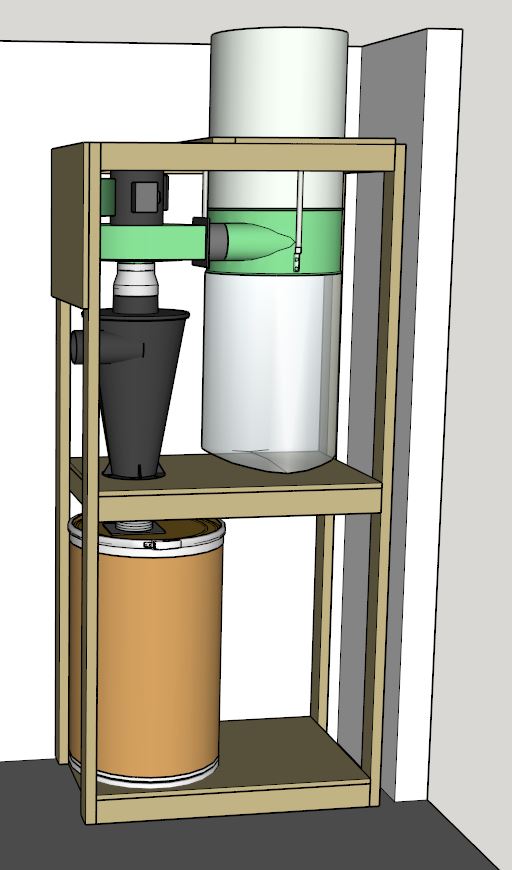
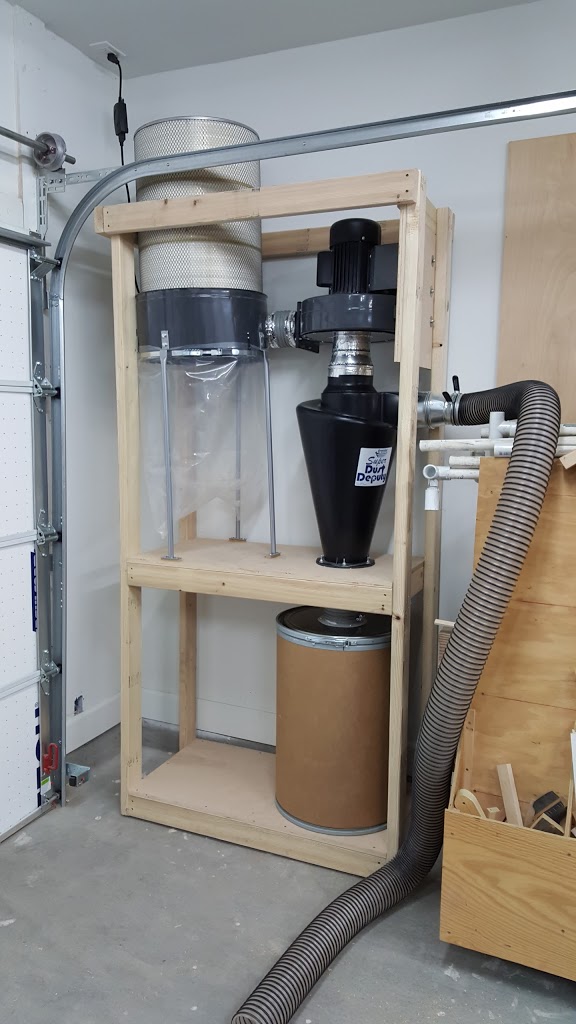
 My original plan and design was to mount it on the wall and then suspend the filter and overflow bag from the ceiling. After remembering how heavy that motor is and that one day I'm going to move this to my future shop, I decided to go for the somewhat more portable design with a full frame around it. Plus if I want some cabinet doors in the front, it wouldn't be a problem.
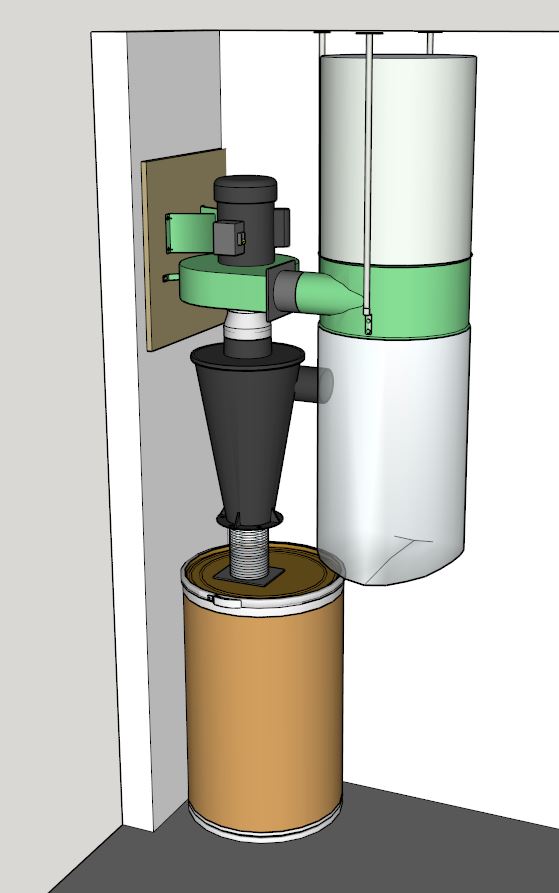
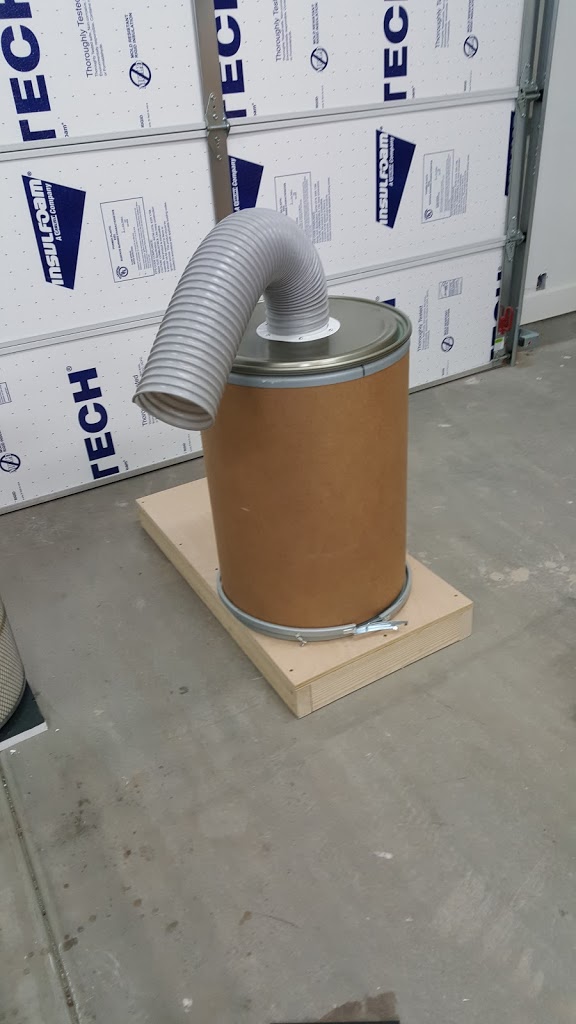
 I built the middle and bottom platforms that holds the 30 gal drum and the cyclone based on the size of the space between the wall and my garage door. Plus that almost exactly the same size as my scrap plywood and it fit the drum and cyclone perfectly. I modified the lid to the 30 gal drum by adding a 5" duct flange. Then using the 5" hose that came with the DC, I cut off about 8" to use between the cyclone and the drum to allow easy removal of the drum for emptying.
When working on the different connections, you'll want to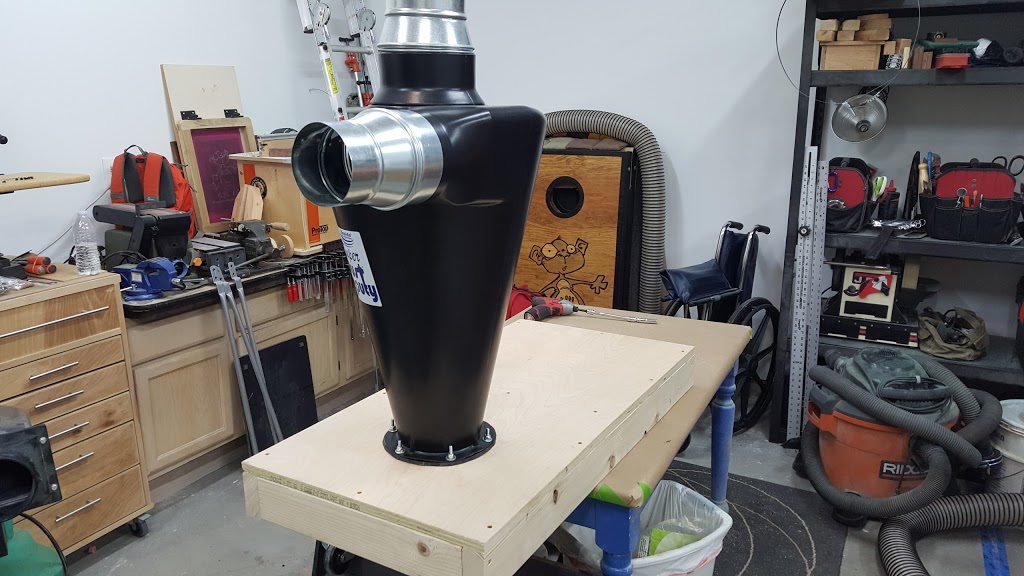 make sure you get a good seal. I'm sure you could probably pickup some weather-stripping or just silicone it but I had some thick rubber lying around so why not make a rubber gasket. I cut the hole in the middle platform making sure to align it so the motor would connect to the mounting board after being placed on top of the cyclone.
make sure you get a good seal. I'm sure you could probably pickup some weather-stripping or just silicone it but I had some thick rubber lying around so why not make a rubber gasket. I cut the hole in the middle platform making sure to align it so the motor would connect to the mounting board after being placed on top of the cyclone.
 After all of the platforms were built, holes cut, flanges and seals were done, I was on the home stretch of this build. I used the rest of the 2x4s and connected everything together making sure there was enough room to provide enough flex in the hose below the cyclone and the waist bin.
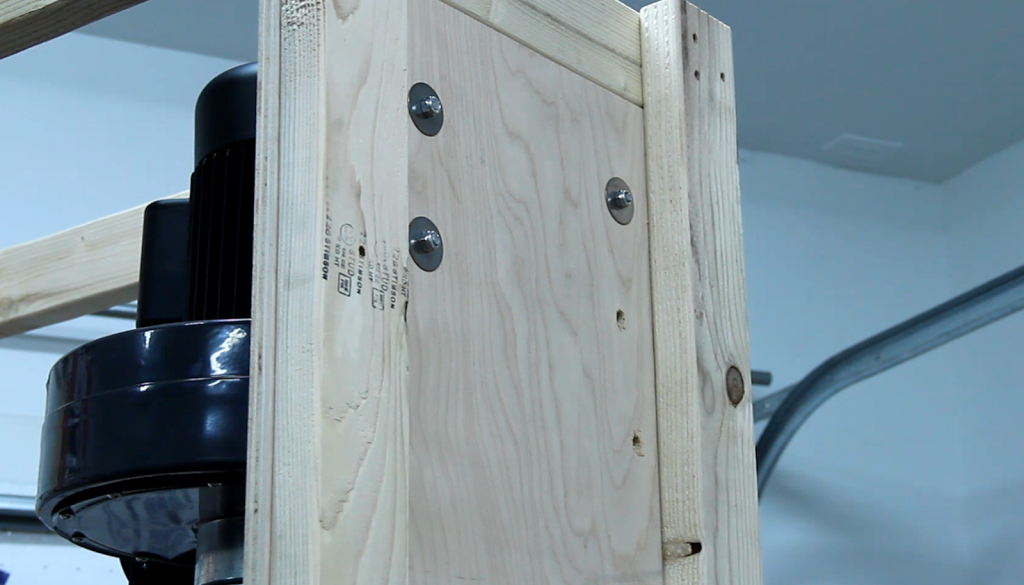 This motor is heavy and I don't want to run any risk of it coming lose, so I put as many screws into the mounting board as possible. I rummaged through my nuts and bolts and found something with large washers that would provide a lot of support.
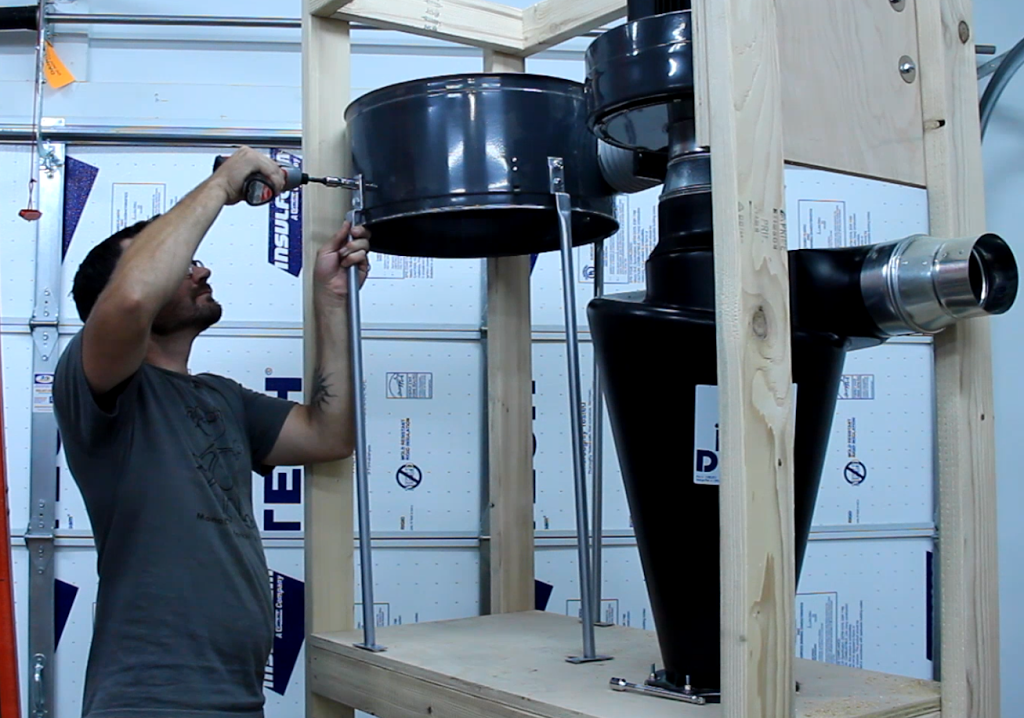 I planned on shortening the bag to the height of the cyclone, the supports for the filter and overflow bag also had to be shortened. I just marked them and cut them off with my grinder. Then using my large vise, I bent them back into the original shape. Then had to promptly add risers to the bottom since I made them all a 3/8" too short.
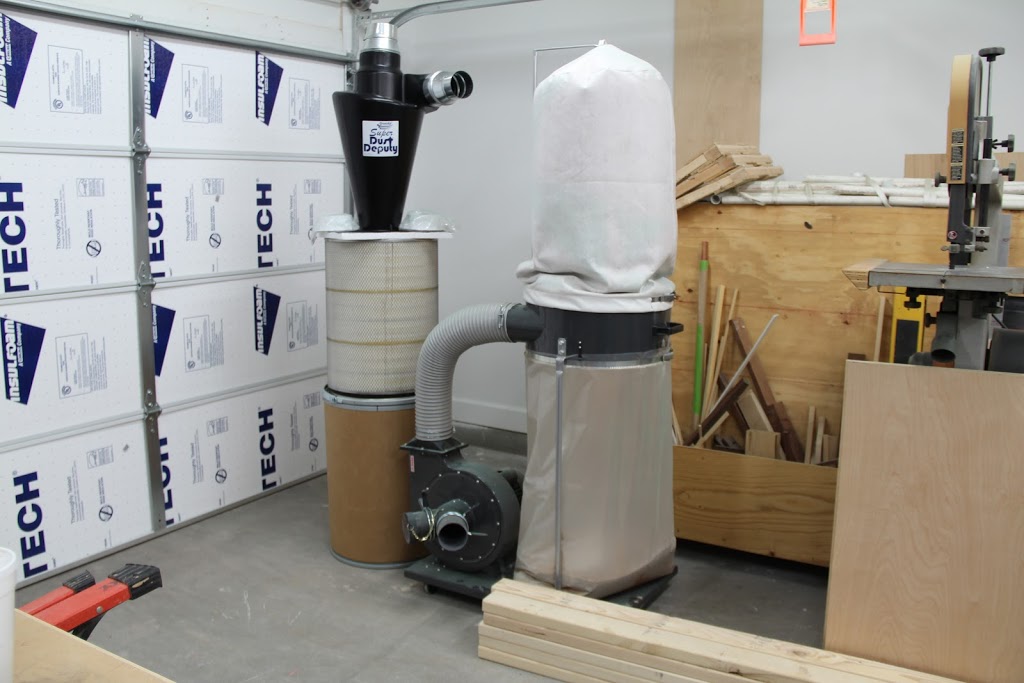
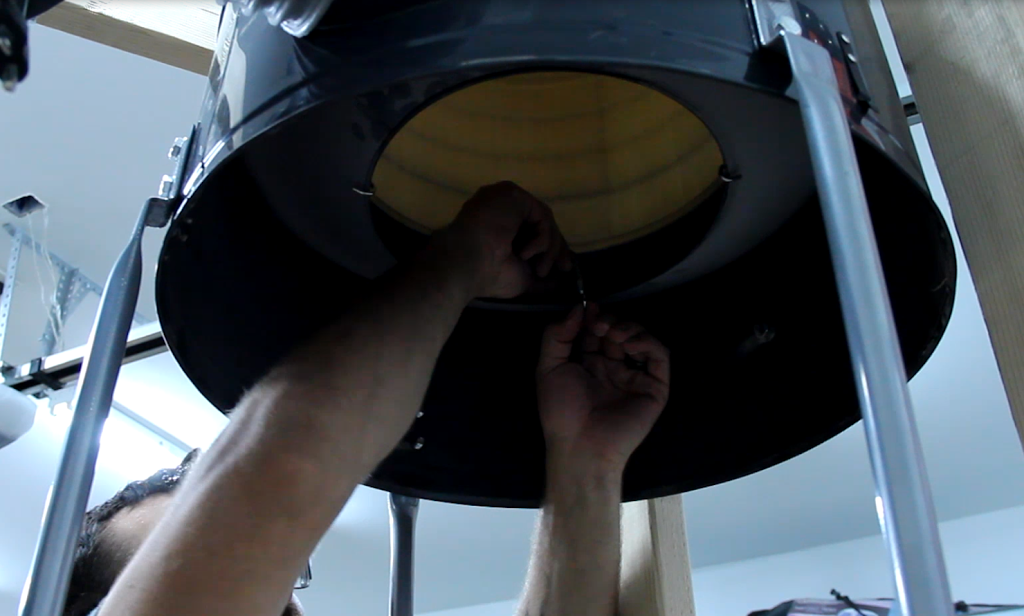 This new canister filter greatly increases airflow and does a much better job at filtering out small particulates that make it past the cyclone. The old filter went over the whole filter frame and clamped on. This one is a little different but almost easier to install. The new canister filter is connected using a few provided turnbuckles between the support frame and internal rim of the canister.
After sealing up a couple of the seams with metal foil tape and hooking up my remote power switch, I was done. It took me nearly an entire Saturday but I finally had a two stage dust collector. Now to figure out ducting around my garage so I can get rid of this temporary flex hose.
 Here's two examples of why it's a good idea to do this modification. The 5 micron bag doesn't filter out fine dust and it can get clogged pretty fast reducing airflow after only a short period of time. Without the cyclone in front of the motor to remove most of the sawdust and chips, you can really damage your impeller blades. In the short time that I've had this dust collector, I can only recall a few times where a larger chip fell down into my table saw and got sucked in.
  Each time you would hear the chip go round and round in the impeller casing causing damage to the walls and impeller blades. You can see in the picture above that only two of my blades were still in near perfect condition. I had to do my best to straighten and repair the rest.